
Everyone loves customizing their controllers. Here we will overview how to remove and replace your buttons and acrylic cover. This information will be applicable to all of our controllers: Hit Box, Smash Box, and Cross|Up.
If you have never physically modded a controller or feel uncomfortable with this process, please either contact your local controller modder to do this for you or go into our Discord and ask for help in the #modding channel.
If simply want to clean your buttons, please use our guide: How To Clean Your Buttons.
Note: This information pertains to PS4 Hit Box models after June 2020, Smash Box models after August 2020, and the PS4 Cross|Up. If your controller is older than this, please use our older blog post.
Starting Off
Tools
Needed:
- #1 Philips screwdriver
Recommended:
- Needle-nose pliers
- Flathead screwdriver
- Tape (for labelling wires - masking tape is best)
- Pen (permanent marker tends to work best)
- Container to hold screws and rivets off to the side
- A positive attitude

1. Remove Bottom Plate
Flip your controller onto its face.
Using the #1 Philips screwdriver, unscrew the six (6) screws from the bottom plate. (Be sure to place the screws in a safe place to ensure you do not lose them.)

Once the plate is removed, make sure it looks like everything is in its place and nothing is missing. It is always good to double-check things are clean too.

2. Labelling the Wires
We recommend labelling or having some sort of documentation of what the wires look like prior to removing them. Luckily, the wires are color-coded and set to the needed length per button, so rewiring has been simplified.
Options for labelling:
- Use masking tape around each wire and write the name of the button the wire corresponds to.
- Write a list of the button positions and the color of wire they use.
- Take a photo of the controller wiring to use as a reference.
Note: All buttons will have a colored signal wire and a brown wire (ie, the ground wire).
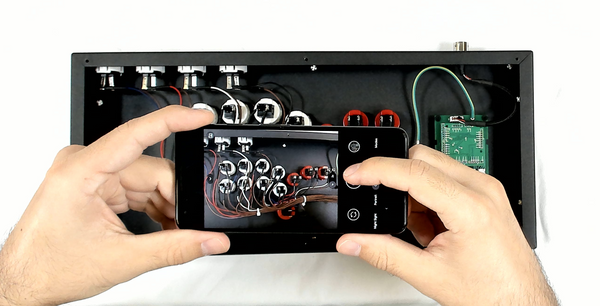
3. Disconnecting the Wires
In order to remove the buttons from the controller, we must disconnect the wire terminals from the buttons.


3A. Hand Method
In most cases, you can simply put your finger under the wire near the terminal, grip it, and then lift up to disconnect the wire from the button. Be sure to hold the controller down as you do this, to provide yourself some leverage.
The wires are not meant to disconnect easily or from day-to-day use, so this may feel a little difficult. If it does, please refer to the plier method below.

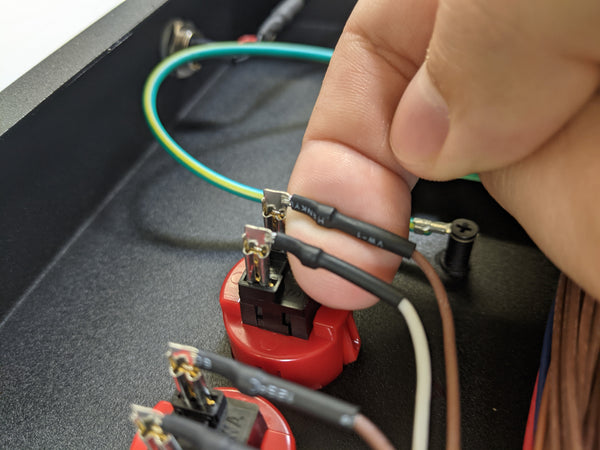

3B. Plier Method
Sometimes the wires are just a little too difficult to get off, but that is why we have those needle-nose pliers!

When using the pliers, make sure you grip at the corner of the terminal - do not grip where the button and wire directly connect, and do not grip on the wire itself.
And, as usual, hold the controller down with your other hand to provide leverage.

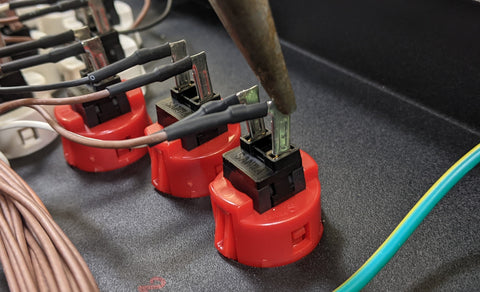
3C. Plier Method (with Case Leverage)
If the above method was still too difficult, try using the case as a pivot point for more leverage.
As before, grip the terminal but this time with the pliers on the edge of the controller's case. You can now push down on the pliers while gripping the terminal and disconnect the wire.


Once you have removed the wires from one button, you can either continue the process with the rest of the wires - be sure to have your wires labelled or documented! - or proceed with removing the button, which we will go over in the next section.
Note: You do not have to remove the wires from the top / menu buttons to remove the acrylic cover.

4. Removing the Buttons
Once you have the wires removed from the button, you can then remove the button from the controller.
On the sides of each button are parts that are keeping the button in place. You can squeeze these with your fingers as push the button out.
Note: Elevate your controller to provide yourself direct access to the buttons on the front of the controller. It is much easier to remove the buttons if your controller is not facing down.


If you are unsuccessful with your fingers, you can use a screwdriver.
Simply push in on one side and push that side of the button out of the hole, then repeat with the other side.


Once you have the button partially out, it should be fairly easy to get it all of the way out.


Continue the disconnecting of the wires and remove each button on the face of the controller. Next you will be able to remove the acrylic cover.
Note: You do not have to remove the top / menu buttons to remove the acrylic cover.
5. Removing the Acrylic Cover
Once you have all of the buttons removed, you can start removing the acrylic.
You will need a screwdriver - we recommend a flathead - to remove the rivets holding the acrylic in place.

Place the tip of the screwdriver on the circular knob of the rivet.


Push down on that knob, and it should go low enough to be nearly flush with the metal case and raised on the other side.


Using your hand or the screwdriver, remove the rivet from the controller.


Place the removed rivet in your container, and continue this process with the rest of the rivets.

Now you can remove the acrylic cover!


6. Installing Custom Art
Once you have the acrylic cover removed you can add custom art and a clear acrylic cover.
Quick custom art FAQ:
Where to get custom art?
Either commission an artist to make art for you - we recommend 5StarGold - or you can create your own art.
Use our art templates to ensure that the art will properly fit on your controller. Please read the instructions that come with the templates.
How to print and cut the art? What type of paper do you use?
If the art was commissioned from an artist that is familiar with fighting game controller art, they may be able to help you out with this process.
If you are doing it on your own (or the artist is unfamiliar with the process) the best options you have are getting your art printed out by a local company like FedEx or Office Depot that offer printing services, and choose a cardstock style paper. You will most likely have to cut the art yourself, in that case we recommend using a precision cutting knife (but a good pair of scissors can work with patience).
Does Hit Box offer customer art, printing, and/or cutting services?
No, Hit Box does not offer any of those services. We also do not offer any customization or modding services. We recommend reaching out to your local trusted modder for any additional help you need.
Installing the Custom Art
Once your art is ready, you can simply place the art onto the front of the controller, line up all of the holes, and then place the clear acrylic on top.
Follow Lord Nola's video directly below to see the custom art installation process.
7. Putting Everything Back Together
To get everything together again, we will essentially be doing the above steps in reverse.
Note: The images below will not show any custom art, but the process is all the same.
7A. Attach the Acrylic Cover
Line up the acrylic cover to match the rivet holes.

The easiest way to get the rivets back in is to separate their parts, and do each part one at a time.

Put the bottom part of the rivet in first, push it in, then put the cap part of the rivet in, and push until it clicks in.
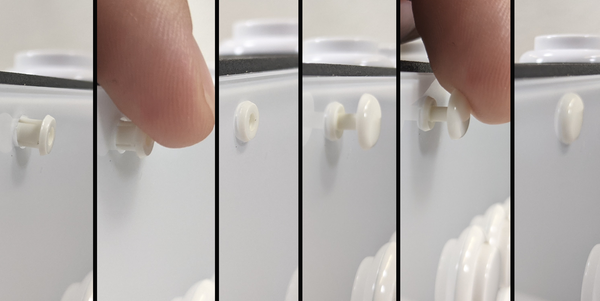
Repeat this process with all of the rivets to get the acrylic top attached to the case.

7B. Insert the Buttons
Next, place the buttons into their corresponding holes. Make sure to line up the buttons to make rewiring easier.

Once you have the button lined up, push it in until it clicks.


Continue this process with all of the buttons.

7C. Reconnecting the Buttons
Once you have all the buttons in, you can now reconnect all of the wires.

Use the references you made in step 2 to put the wires on the correct buttons. Remember that each button will get a colored signal wire and a grounding (brown) wire. The ordering of the wires does not matter on the buttons.

7D. Before continuing, connect your controller to a game to test out if the buttons are wired in the right order and all the buttons are working.
- If some buttons are in different are in different spots then they should be, use your wire reference and the game to move wires to the correct buttons.
- If a button does not seem to be working, make sure the wires are fully on the button.
7E. Attaching the Bottom Plate

Once all the wiring is finished, place the bottom plate on the controller and start screwing in the screws.

Once all the screws are in, you are all finished. Congratulations on removing and replacing the buttons and acrylic!

Now you're finished!
After you're done be sure to share your customized controller with us.
- Tag @hitboxarcade on nearly any social media platform.
- Post in the #gallery channel in our Discord.
- Post with the "Gallery" flair on our Subreddit.
Thank you so much for your support and may your inputs be blessed!